-18%Sold out
")
")
")
")
")

Here are some similar items ...

Original price was: $115.00.$94.00Current price is: $94.00.
Original price was: $98.99.$80.99Current price is: $80.99.
Original price was: $65.99.$53.99Current price is: $53.99.
Original price was: $89.99.$72.99Current price is: $72.99.
W. Sung –
Very nice small label printer. If you need to organize your stuff step one put labels on them is so much easier to see whats inside a box seeing the label that taking it out opening and, sort the things inside. The print size is up 24mm wide perfect to put all your info and show ho owns that item (maybe a laptop, tablet you name it) and the best of this is that the label are laminated and are more durable that paper ones It uses no ink, toner or anything else just the label ribbon. The software is very easy to use more if you have use some image design software before (mspaint, ms power point, etc) Cons: You need to use a computer, not a big issue but is good to know that you cant do anything with this without any computer (PC or MAC) Before printing any size label the printer cuts about (or WASTE) 3/4 of an inch of tape before printing your label, the only solution that i have found is that you need to print several labels at once to make continuous jobs (the printer will cut all the labels no problem). Note: was not paid to make this review is any way (no discount, no free stuff, etc)
Naaman Geist –
When I was considering purchasing this printer I read several reviews with complaints about the waste generated by the printer, cutting off a one inch piece of tape before every label printed. While I did find this to be true out of the box, I’ve found a work-around that will reduce the waste to one print session, rather than each printed label. If you click on the check mark icon just to the right of the Print button and check the box for Chain Printing (see attached screenshot), the printer will take an initial cut for calibration (1″ unprinted piece) and then print all your labels except one, waiting to cut it until your next print command (see attached pic). You can then open or create your next label and print it without the calibration cut, cutting your final label from your last print command instead. Then, when you’re done with the final label, just push the scissors icon (cut) button in the P-touch toolbar or on the printer itself. I’m much happier with this printer, now that this issue is resolved and like the print quality much better than my previous handheld printer by a different popular brand. One other tip, install the printer driver before connecting the printer to your computer. I installed it after connecting the printer and my Windows 10 OS installed a generic driver and installing the driver on the CD didn’t fix it, initially. It took me several minutes trying to figure out why my PC couldn’t find the printer. It wasn’t in the Printers & Scanners list and when I tried to add it, the PC couldn’t find it. I finally found it in the Devices and Printers list under Unspecified Devices. After going to it’s properties and clicking Update Driver, if found the driver I installed from the CD and the PC then recognized it as a printer.
del_ –
I admit it, I am a font addict. There is no support group for it, so I just embrace it! 🙂 I have found many great labelers out there, but was hesitant because they just didn’t have the ability to print more than a couple handfuls of fonts. I wanted it all, so I bought this 🙂 Simple Connectivity-No software or drivers needed; Just connect via included USB cable to get started *To be honest, I didn’t just plug it in and go. I saw the Installer CD and popped it in, so whether or not it is needed, I cannot answer that, sorry. But don’t let that stop you! It was still a breeze to install and start using. Customize labels using fonts, graphics and logos from your PC or MAC; Even download templates from the cloud to add to your P-touch editor library *Whatever true-type font (.ttf) you have on your computer, you can print out using this machine! I am in heaven 🙂 And, though it’s monochromatic, I can print graphics as well AND it also has an auto-cut option. I really like the versatility of this label maker! Flexible power source; Works with AC Adapter (included) or 6 AA batteries (sold separately) *Indeed, it is flexible. I have not used batteries yet, as I have it plugged in at my computer desk. I am not sure how long the batteries would last, but I am glad that I have that option. I don’t see myself needing batteries anytime soon as it is hooked into my computer…which is plugged in as well…so I would never see a lack of an outlet 😉 So, I say to the world, if these specs meet your criteria for a label maker, you must have this one! You won’t be disappointed 🙂
Bayou Gal –
Damn thing works great. I upgraded from a P Touch handheld- it worked well, too, but I needed a lot of plant labels and got behind trying to produce them one at a time. What a difference just importing a spreadsheet of 37 at once! Print, cut, print, cut, one after the other. And the .94 size fits zinc metal plant stakes perfectly, vs 2 strips each time with the handheld model’s width limits. Exactly the convenient personal solution I needed. Worth every penny.
chris2519 –
This is a simple device made to do something simple – print a LABEL. It doesn’t require much thought or design planning. Why then is there not a SIMPLE piece of software that you can have pop up, type the information you want in the label, have the machine sense what type of label stock is installed, adjust widths and lengths accordingly, and JUST PRINT WITHOUT TEDIOUS MANUAL MANEUVERING AND MENU SELECTIONS? This software is needlessly complicated and feels (and looks) like it was ported over from some Windows 98-era software. I want simplicity. I want to type and print a label in less than 10 seconds. I don’t want to have to make sure that the $%^& print driver tape selection matches the tape selection in the unit, I don’t want to have to manually grab ruler bars to adjust the length of the label to what I am typing in, etc. Someone needs to program a simple, fast app that pops up, asks you what to print, AND THEN DOES IT. The hardware itself is terrific, but I have used this thing less than 5 times since I bought it two years ago because it’s such a pain in the a$$.
Angela M. –
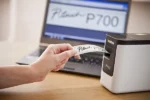
There are some reviews here that look at this thing as incredibly complicated or a pain to set up. It is neither of these, and was actually quite easy to set up. Using my Windows 10 machine, I first went to the Brother P-Touch website and downloaded the full software drivers and installation package. When I ran the setup, it instructed me to plug in the printer at the correct time it needed it. The setup went flawlessly. I ran the software updater tool which updated the firmware on my PT-700, including the express software on the included partition. Super easy. The P-Touch Editor 5.2 software is fairly straightforward to use. There’s a lot of options available. I would say it is not naturally intuitive. You can pick up any Brother P-Touch standalone label maker and understand how to use it fairly easily. The software here takes a little bit of time to learn. In the Express mode, you click on the paper settings to specify the tape width, length (or auto), margins, and orientation. You then click the large A to enter text mode, and a text box is automatically created on the label. Enter what you want, press Enter for new lines. The software will let you add infinite lines, but your practical limit based on printer resolution is really 7-10 lines at 3.5 pt font each. You can then select the Frame option, pick whatever frames you want (including specialty ones). You might have to go back and adjust label width if a frame doesn’t fit. You can also add clip art or images to your label. I took the profile picture of my significant other, made it into a label with hearts on it as a gift. The Layout option lets you change where object boxes line up on the screen. You have to click the frame of that object to get it to accept those commands. The benefit of an object box editor like this is that it makes things easier when you’re doing database connections. Brother has a good video detailing how to do this on their Youtube page. Basically, you can connect any database or CSV file and link fields on the form to specific object boxes, and line those up wherever is needed on the label. You could automate mailing address labels this way, or name and ID labels for sign in sheets or something. The possibilities are endless. Also, with this printer sitting on my desk, I have to say this is one of the sexiest office appliances I’ve owned yet. The white and black contrast looks great. The unit is weighted well so it doesn’t fall over. And you can add batteries which stabilize it even more and provide some backup power. The printer does spit out a 1 inch segment before printing to ensure that the tape is properly fed before printing. It’s an unavoidable part of the design, and only wastes like 3 cents. Not a big deal. The only problem I have with the printer is putting new cartridges in and out requires opening the side, like an old Walkman cassette player. But that’s an unavoidable problem considering the form factor. Overall, this is a great printer, and I have no regrets buying it for $30 used after someone returned it who hated it. Great buy!
Erin E. –
Easy to use and easy to set up on the computer. I love that you can use multiple style and size tapes in it. It is a must for all things labeling. Prints fast and dymo is always durable.
Midland Painted Turtle –
I’m not aware of a better product and any sane price. The PT-P700 and PT-P750 are basically the same unit, the P750 just adds wireless. If you don’t need wireless, the P700 is about half the price. Generally a good unit, prints sharp labels, etc. Uses Brother TZe labels up to one inch (25mm) wide. There are lots of choices in colors widths, adhesives and even materials that will fit this printer. Things I Wish Brother Would Fix: While this is a good unit for the price, and I feel better than the competing units that I am aware of, there are a few places where Brother might focus their efforts. I often wish I could print on winder labels. Brother’s TZe family does include a wider 1.4” (36 mm) label size. Unfortunately, this unit will not take them. The P-touch Editor for the Mac is adequate. But not perfect. Every character in a block of text seems to have to be the same. As far as I can figure out (AFAICFO) you can’t mix character sizes, bold/plain/italic, fonts, etc in the same text block AFAICFO, there isn’t a pdf manual for the editor. And the built-in help often isn’t. AFAICFO, you cannot make small barcodes. The application seems to pick the size for you and you are stuck It isn’t as intuitive as one might light. But, with long term use, I have found how to do some things that I didn’t know. So maybe there are some hidden features that I haven’t yet figured out. I often find myself wishing that I could make the margin/border smaller instead of having to waste part of the label in a non-printable border. It would be nice if the Brother software would let one print to the very edge of the labels. And oddly, to get updates from the Brother web site, it seems you have to have registered the product and know the unit’s serial number. (Not sure why as I can’t imagine using the P-Touch Editor for writing letters or the like, so it would be pretty useless to someone who didn’t have a P-Touch. Sometimes the white on black labels could have more contrast (gray on black). And if it could sharply print smaller type, that might be nice too.
DK –
Brother is not trying to screw you out of tape. Look at the tape cassette. It’s a 3-part system: the black “print” material, the laminate, and the adhesive label itself. You’ll see there is a feed roller at the exit that pulls them together and laminates them. There is not a time when there is not a laminated label started, otherwise you’d have two pieces getting jammed up. This starter piece is the part that gets cut. The only thing they could have done is move the print “head” closer to the feed wheel, but you can only get so small (without paying 35 bucks a cassette) and you’d save another, what, 1/4″ or so. There are 314 inches on a roll. My labels so far have been slightly over one inch, so maybe 300 labels. Some (very) rough math: -10 labels per strip, a 10% loss with that cut off end. 10% of 300 leaves 270 usable labels, at $9 for the 1/2″ white cassette, comes to 3.3 cents per label. -6 labels per strip, a 17% loss with that cut off end. 17% of 300 leaves 249 usable labels, at $9/cassette, which comes to 3.6 cents/label. -1 label at a time, a 50% loss with the cut off end. 50% of 300 leaves 150 usable labels, at $9/cassette, comes to 6.0 cents/label. Even though it can get pretty wasteful, you can’t buy custom labels for that. Honestly, I don’t know how they can make money on this thing. $40-$45 for the printer, and $9-$11 for a complex, 3-part, laminating cassette. Look at that cassette. It’s brilliant. Anyone would be hard pressed to go out and manufacture the same thing for the same price, and it would still cut off an inch of tape. I’ve seen Lego pieces more expensive than this. You’re not paying for X amount of tape, you’re paying for the engineering that allows this thing to print durable labels quickly, reliably, and jam free. I’ve been around enough commercial/industrial heat and laser labelers to know waste. All the mis-feeds, jams, alignment problems, carbon tape hang-ups, hours spent fixing it, hours wasted not inventorying/bagging/shipping… you throw away the cost of this printer and tape combined at least weekly, sometimes daily. All that said, I hope this printer lasts a while. I am very impressed with the label quality. I also wish they ditched the battery pack area and made it smaller, but I guess some people would need this in the field. If Brother really wanted to screw you, they’d offer an $80 add-on battery pack like the Chinese tool guys do (Milwaukee, DeWalt).
Alan Robertson –
I have owned a number of handheld label makers over the years, and while I was reasonably satisfied with the output, they are always kind of a pain with their awful keyboards. Those days are over. While it seems a weird thing to get excited about, I love this printer, and I wish I’d bought it much sooner. The software is fairly intuitive, and the printer is fast. During a major household re-organization, I was banging out labels at a furious rate, which totally satisfied both my wife’s and my OCD demons. Plus, the fact that this has a permanent home on my desk makes it far less likely that I’ll misplace it – a thing that’s happened to me many times in the past.
M. Benedict –
Based on the reviews, I almost passed on this one. Too many reviews complaining about how hard the software was to install, the thing needing a bunch of tape wasted for each label and trouble hooking it up. I read between the lines and ordered it anyway, assuming the reviewers were lacking tech savvy. Now for my experience: I downloaded the latest software and printer driver software from Brother, ignored trying to use the included disc, and ignored the setup guidance on the user sheet. Now I know this thing is getting old, as the instructions want to know if you’re using Windows Vista, Windows 7, or Windows 8. The stuff on the Brother site asks if using things like Windows 10 and Windows 11! Hooked up the power, put a label cartridge in, and connected the USB cable. Ran the downloaded program and it took care if everything. Loaded the print software, updated itself, installed the latest of everything, asked if I wanted to download manuals, and when finished, I loaded the design software and was printing my first label within minutes! Very good experience!!!! And although an older piece of tech? I wanted one that used AA batteries and connected via USB! I cannot speak to setting this up on an Apple computer, but it was too easy on Windows 11!
Barry Watson –
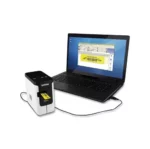
I bought this PC USB connected label printer to replace a handheld brother label maker. The handheld unit worked nicely but I found the small display to be very difficult to read, and the operation to be a bit difficult. This PC version is so much easier to use, has more capability, uses the same excellent TZ style tape and can be battery powered for easy movement between computers. No software install is required, the device appears on the computer as a disk drive that contains the label making editor (lite version) program. Super easy, works really well, and making the labels on screen with a real keyboard is just so much easier than fussing with the handheld unit. If you want to make more complicated labels you have the option of installing the full version of the label editing software on your computer, but so far I have found the light version which requires no install to be perfectly adequate for my needs. This unit has made making labels fast and easy, and I recommend it highly.
mpops –
A month ago I bought Brother’s PDT220 label printer. I fell in love with its TZe tapes, but found that the printer had unacceptable fonts and was very difficult to operate. So I bought this printer instead, and I wish I had started with it in the first place. It is really, really easy to get started: I just plugged it in and turned it on, connected it to my windows computer, and opened the file manager, looked for USB devices, found the printer, clicked on it, and viola! the software loaded and started running. No drivers, no complex installation, it just worked. The software is easy to use; it can use any of my fonts; and when I wanted more sophistication I found I could use my existing P-Touch editor (after downloading a driver). If you have a computer, don’t bother with a manual label printer; and just go directly to this one.
Blue –
I bought the PT-P700 for use with my Mac Mini, OS version “Lion”. I took a chance with the purchase despite the numerous reviews here that said that this product would not work on a Mac platform. My PT-P700 is working, but not without some help from Brother Tech Support. However, most importantly, everyone should know that the PT-P700 is capable of working just fine on the Mac. Don’t shy away from this product just because others have had a rough experience getting it to work with their Mac’s. Also, note that the button on the top, left side of the PT-P700 is for “P-Touch Lite”. If you intend to use the PT-P700 with your computer to take advantage of the all of the advanced features/options that the handhelds don’t have, make sure that the “P-Touch Lite” button is OFF (meaning not lit up)! Otherwise, the full version of “P-Touch”, which is what you really want to be using, will not work and also your PT-P700 will not be fully “visible” to your Mac and all of its settings. Make sure that only the power button (which is the third button to the right) is lit up. I’m giving this product 4-stars because although it’s working now, Brother made this way too difficult to set up. I would describe it as “inexcusable” actually. I spent an ungodly amount of time on the Brother website trying to figure out why this was not working right and wondering whether I had made a mistake. I needed to call Brother’s technical support, spending a 1/2 hour on hold first, in order to get the connection between the PT-P700 and my Mac to work. After the call, it was obvious to me that the Brother written instructions and manual for the PT-P700 were inadequate and now I understand why some reviewers claimed that this product did not even work with a Mac (which is not true in my case). Otherwise, the PT-P700 would earn 5 starts from me. Recommendation to Brother: Create an insert in your packaging just for Mac users. Explain the setup process is explicit, step-by-step detail with illustrations just for them, because they will need it!
Darell D. –
I have read very little about using this with a Mac. But what I HAVE heard from other reviews, made this a painless experience for me. I have a Macbook Pro running Yosemite, 10.10. And this machine works flawlessly ONCE YOU TURN OFF THE Plite button on the top. That thing defaults to on when first plugged in. Turn it off by holding the button down until the light goes out, and it stays off. This prevents the device from using the onboard software. When you put the DVD in the (external, of course) drive on your Mac, you are basically presented with a link to download the software and drivers. I simply installed everything on offer from the page I was taken to. And… everything works exactly as it should. 1″ of waste for each print job: I asked the company about this, and have finally heard an explanation. It is not just to sell more tape as it seems. It is, sadly, an integral part of the lamination/fuse process. The process cannot begin at the very end that was just cut. It isn’t a perfect system, but the cost of doing it this way just isn’t THAT high. Best way to save tape is to print multiples at a time – assuming you want more than one. IF you want different labels, just create one long label with all the stuff you want, and print that out instead of individual labels for each item. Worst thing you can do is print a bunch of labels that you’ve screwed up and have to throw away. So use Preview, and be sure all your goodies are inside the little box in the template so you don’t have truncated text and graphics… and don’t sweat the bit of waste at the beginning of each print job. When it is time to order new tapes (I did immediately, and love the high-strength adhesive stuff). Search on the tape number. The chart that comes with the device makes this very easy. Oh, and one final thing… I have other Brother Label makers that use TZ tapes… and I have a LOT of TZ tapes, I thought they’d work here, but maybe not be auto-size sensing? Wrong. The tapes must be TZe, dang it. NONE of my old tapes will work in this machine. Pretty sad because I’m not sure what the “e” gives me beyond auto size-sensing. And I REALLY don’t need it to know I’ve got a 1/2″ tape in there. I can read and click that button myself. But the TZ tapes will not physically fit in the machine due to the additional tab that the “e” adds to these things with little contacts that provides the data. Let me know if you need a great label maker that works with Windows and TZ tapes! :sigh: Bottom line is that because others have suffered to alert me to how it will work with the Mac, my experience has been flawless except for having to buy all new tapes again. I have other Brother Printers, but none of them would work on the Mac, so the entire reason I purchased this was to work with my current computer. And… yay. It does. Perfectly.
Keith Walker –
Rapid delivery. A very versatile machine which works well for multiple labels from an Excel spreadsheet. I use windows 11 and up-to-date drivers are readily downloaded from the manufacturer’s website. Use it to make labels for my cactus collection